Check out some of the amazing new products that launched yesterday!

Grab Your Stamps & Ink 'Cause We're Going on Stampin' Adventure

Check out some of the amazing new products that launched yesterday!
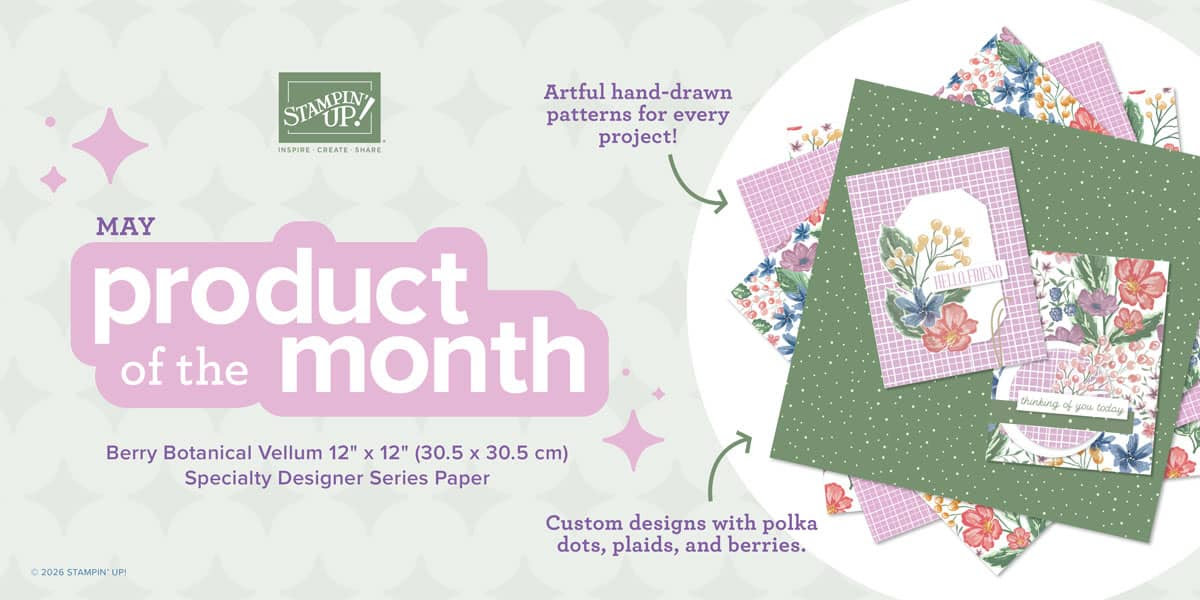
Each month, Stampin’ Up is releasing a Product of the Month. This is limited to one month’s product per Stampin’ Up! account and are only available while supplies last, so once they’re sold out, they’re gone for good.
Click here to learn more about this new offering.
Get the exclusive Berry Botanical Vellum DSP for only $5 when you spend $75 or more in a single order this month of May!
Product List
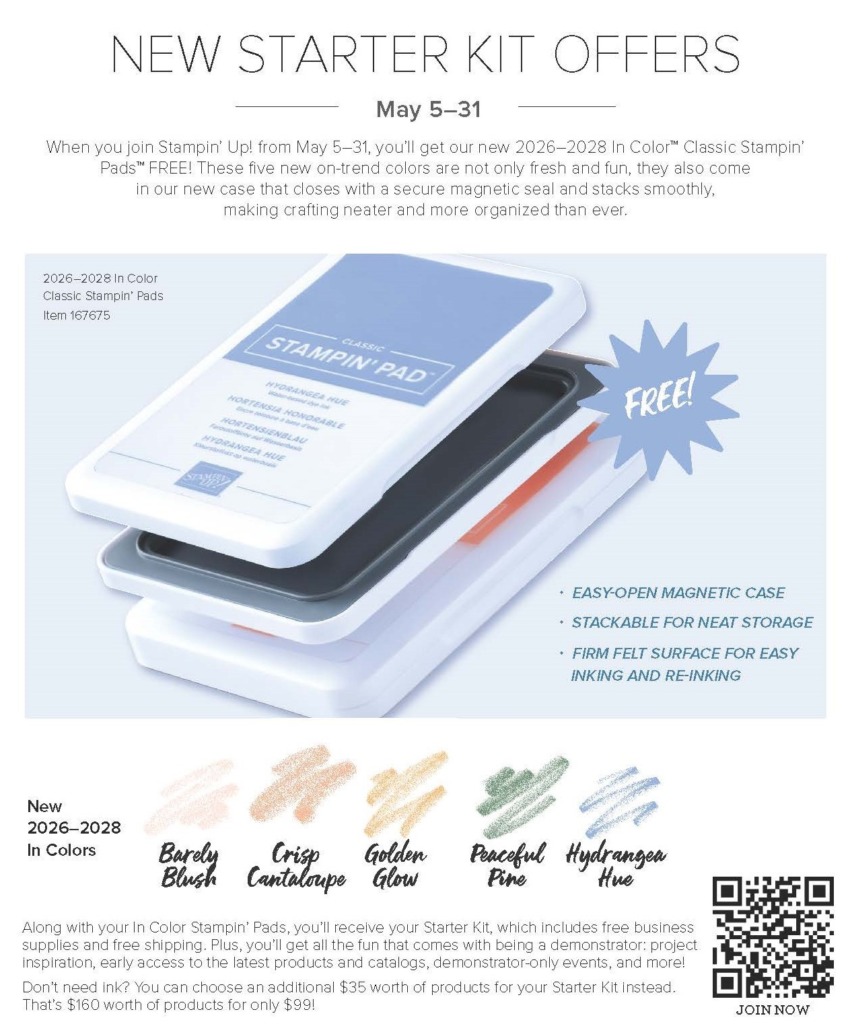 If you’ve ever thought about joining Stampin’ Up! for the discount, the community, or simply to enjoy your hobby a little more, this is such a great time to do it. From May 5–31, when you sign up as a Demonstrator, can choose one of these two Starter Kit specials:
Product List
![Peaceful Pine Classic Stampin Pad [ 167679 ]](https://assets1.tamsnetwork.com/images/EC042017NF/167679s.jpg "Peaceful Pine Classic Stampin Pad [ 167679 ]")
![Golden Glow Classic Stampin' Pad [ 167676 ]](https://assets1.tamsnetwork.com/images/EC042017NF/167676s.jpg "Golden Glow Classic Stampin' Pad [ 167676 ]")
 The wait is officially over! The new catalog is here! There is so much to love, but here are a few things you’ll definitely want to check out first:
Share love and support through all of life’s highs and lows with the Unbounded Beauty Suite Collection. Featuring our 2024–2026 In Colors, this suite has beautiful patterned paper for handcrafted cards. Add variety and layers with stamped soft floral images and die-cut frames, flowers, labels, and greenery. Tie everything together with the perfect sentiment for a variety of occasions including sympathy, babies, birthdays, thank you, and more!
")
Take a stroll through a beautiful Mediterranean town with the Mediterranean Blooms Suite Collection! Tangy citruses, tilework designs, and charming sentiments are a great addition to any crafting collection. Die cut the fruit images to create sweet centerpieces on your cards and color them using your favorite watercoloring technique. Turn the lemon, orange, and tilework paper into beautiful card bases, backgrounds, paper boxes, and gift tags.
")
Color is at the heart of crafting! From color wheels to color families, you can be a color explorer and try something new. Plus, discover our new 2024–2026 In Colors and add them to your collection.
The New Stampin’ Up! annual catalog debuted on May 1st. It’s always an exciting day when a new catalog begins. The layout this year is a little different than previous catalogs. Enjoy the following video, which explains the new layout and how to get the most out of your catalog. If you don’t have a Stampin’ Up! demonstrator, and would like a catalog, please feel free to contact me.
Kits by Stampin’ Up! are perfect for new crafters, busy crafters, or crafters who want quick and easy projects. All-inclusive project kits have everything you need in one box! Give as a gift or try them yourself. Kits are available while supplies last. Stampin’ Up! will be releasing two new kits each month! Here’s a look at this month’s releases:
 Say hello, happy birthday, or recognize someone with the Your Day to Shine Kit. Everyone will appreciate one of these pretty floral cards and matching envelopes. If you’re new to card making, you’ll love how this kit makes crafting super simple, because all of the pieces are printed, die cut, and ready to use—no stamping or cutting needed! If you’re an experienced crafter, you’ll love the artistic beauty of these card designs. Includes sentiments in English, Dutch, French, and German.
 DIY a classic cup-and-ball game! With the Frog & Friends Kit, you can craft six cup-and-ball games in three designs: a fun frog, a flashy fish, and a silly shark. The kit includes everything you need to complete the toys, even googly eyes! It’s a great kit for crafting with kids, grandkids, nieces and nephews, play groups—kids and kids at heart!
Product List


Tomorrow is an exciting day, as Stampin’ Up! will be debuting lots of new products! There will be new stamp sets, new dies, new suites, new ribbons, new embellishments and much more! See the two videos below for a sneak peek! Remember to order early, as new releases tend to sell out quickly. The Host Code for this month is VNF6WKS6.
![Berry Botanical Vellum 12" X 12" (30.5 X 30.5 Cm) Specialty Designer Series Paper [ 167985 ]](https://assets1.tamsnetwork.com/images/EC042017NF/167985s.jpg "Berry Botanical Vellum 12\" X 12\" (30.5 X 30.5 Cm) Specialty Designer Series Paper [ 167985 ]")
![Crisp Cantaloupe Classic Stampin Pad [ 167680 ]](https://assets1.tamsnetwork.com/images/EC042017NF/167680s.jpg "Crisp Cantaloupe Classic Stampin Pad [ 167680 ]")
![Blushing Bride Classic Stampin' Pad [ 147100 ]](https://assets1.tamsnetwork.com/images/EC042017NF/147100s.jpg "Blushing Bride Classic Stampin' Pad [ 147100 ]")